

QuickBooks comes with perfectly usable sales form templates. But you can modify content and appearance to make them yours.
When you receive an invoice or bill in the mail or online, how much attention do you pay to the way it looks? You might think you don’t, but any communication we receive from the vendors we patronizehas an effect on us. We’re probably more likely to notice it if it’s particularly good or bad.
Any interaction you have with your customers has impact on their perception of your business. How do you want them to think about you? If you send invoices that are professional and polished, it can reflect on you positively. Unattractive sales forms that have a lot of empty, unused fields may make customers wonder about your commitment to excellence.
Some of your customers will just glance at your invoices and pay them. But you shouldn’t miss an opportunity to make a good impression, especially when it’s as painless as customizing your sales forms in QuickBooks. Here’s how it works.
Modifying Your Templates QuickBooks comes with pre-designed templates for each type of sales form it supports: invoices, estimates, credit memos, sales receipts, purchase orders, statements, sales orders, and payment receipts (you may not have access to all of these depending on what version you’re using). You can see the list by opening the Lists menu and clicking on Templates.
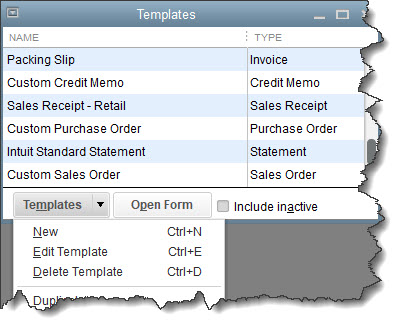
QuickBooks comes with modifiable templates for numerous types of sales forms.
Let’s look at an invoice template. Right-click on Intuit Service Invoice in the list to open the action menu, then click Edit Template. Click on Manage Templates, then click Copy at the bottom of the window to make a copy of the original so you can practice. The Preview in the right pane is named Copy of Intuit Service Invoice. Click OK.
Tip: You can use the Copy command to make and modify multiple copies of any sales form that you can use for different purposes and/or customers.
Now you’re back at the Basic Customization window. Check to make sure the Selected Template field reads Copy of Intuit Service Invoice. You can practice using this one and delete it when you want to work on your main template. Click the box in front of Use logo and browse in the window that opens to find it. Double-click on it, then click OK in the small window that opens to confirm, and QuickBooks returns you to the previous window with the logo showing in the Preview pane. If you want to change the color of the invoice, click the down arrow in the field below Select Color Scheme. Choose the one you want and click Apply Color Scheme.
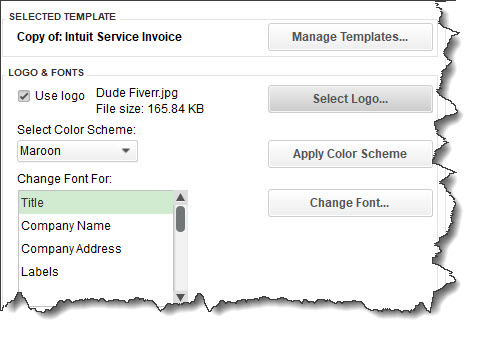
You can add a logo and change the color scheme and fonts used on your invoice. The preview in the right pane (not shown here) updates to reflect your modifications.
If you want to change the fonts for the four fields pictured above, click on each and then click Change Font to open a window with your options. Below that is the list of fields available for your Company & Transaction Information that is positioned next to your logo. You can click boxes to check or uncheck the fields you want to appear.
Warning: If you select too many fields, you may have to use the Layout Designer to position them on the invoice, which can be challenging.
You can also turn on the Status Stamp and Past Due Stamp to display the status of each invoice (Paid, Pending, etc.) using a graphic that looks like you’ve stamped the form.
Selecting Fields and Columns QuickBooks also gives you control over the fields and columns that appear in the body of the invoice. Click Additional Customization at the bottom of the window. In the window that opens, you can change three things for the content that appears in the header, footer, and columns. By clicking boxes and entering text, you can indicate which fields should appear on the screen and which should be printed. You can also edit the default field titles. Click on each tab at the top to see all of your options.
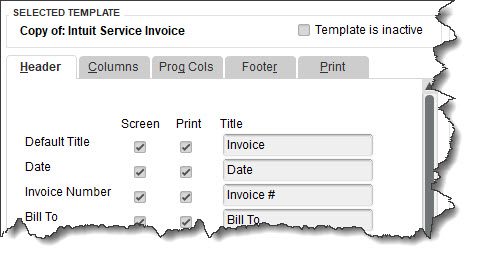
You can tell QuickBooks which fields should appear on the screen and on printed invoices, as well as how their titles should read.
As you’re making these changes, QuickBooks will warn you that you might have overlapping fields and that, again, you’ll have to use the Layout Designer. You can click Print Preview at any time to see what your finished invoice will look like and decide whether you want to try to modify your design. If you’re just adding, deleting, or moving (drag and drop) a few fields, this may work fine for you. But QuickBooks is not a sophisticated graphic design program, and your results may not look professional if you attempt too much.
When you’re done modifying your template, click OK. Copy of Intuit Service Invoice will now appear in the list of options that drops down under the Template field at the top of the screen when you’re creating an invoice. If you want to edit, delete, or hide it by making it inactive, you can do so by again going to Lists | Templates and clicking on its name, then clicking the down arrow next to Templates to open the action menu.
Tip: You can also click Duplicate, which will open a list of all of your sales forms. Select one and click OK, and you’ll be able to transfer your formatting preferences over to it. We doubt you’ll have much trouble customizing your sales forms in QuickBooks, but you may have other problems you’d like us to address. There’s so much the software can do to help you understand and manage your finances that you may not yet have explored. Contact us if you want to expand your use of QuickBooks, or if you simply need help developing a daily workflow.